Last Updated: January 2026
Listen up. If you’re buying new construction in North Texas right now, you’re stepping into a process that most agents don’t understand and most builders won’t fully explain. That’s not conspiracy, it’s just reality. Builders are optimized for volume. You? You’re optimized for getting your family into the right home without getting blindsided.
This is your comprehensive guide to what actually happens between “We love this floor plan!” and moving day. More importantly, it’s your roadmap to understanding why each phase matters, what questions to ask, and how to protect your investment at every stage.
Because here’s the truth: chaos is opportunity, and the new construction market in Ellis County and greater DFW is absolutely controlled chaos right now. Let’s position you to win.
Why New Construction Timelines Matter More Than Ever
The North Texas new construction market is constantly evolving. We’ve seen interest rate volatility, building material supply disruptions, and a fundamental shift in how builders manage inventory and timelines.
The reality check: Most buyers think “8-month build time” is a promise. It’s not. It’s an estimate based on perfect conditions that rarely exist. Understanding the actual construction timeline and what can go wrong at each stage, is your competitive advantage.
Here’s what you’re getting in this guide:
- Stage-by-stage breakdown of every phase from contract to keys
- Builder-specific differences between Highland, Centre Living, Graham Hart, Bloomfield, John Houston, and others
- Critical inspection points where you can (and should) ask questions
- Red flags and warning signs that your timeline might be derailing
- Tactical advice for protecting yourself at each milestone
Let’s get into it.
Stage 1: Contract, Structural Options & Design Selections

What’s Actually Happening
This is where most buyers think they’re “done” after choosing their lot and floor plan. Wrong. You’re just starting. This stage is where you lock in the bones of your home, the structural modifications that can’t be changed once foundation is poured.
Critical activities:
- Community and homesite selection (not all lots are created equal, ask about drainage, sun orientation, and future development)
- Floor plan confirmation with any structural modifications
- Contract execution with earnest money deposit
- Design center appointments for finishes, fixtures, and upgrades
- Permit submission process begins
The Strategic Reality
Here’s what builders won’t emphasize: every upgrade you select creates another potential delay point. That gorgeous tile you chose? If it’s backordered, your timeline just shifted. The structural changes to add that media room? That requires re-engineering, which means permit delays.
Questions to ask your builder:
- “What’s your actual average construction time over the last 90 days, not your marketing timeline?”
- “Which selections have the longest lead times right now?”
- “What happens to my timeline if any of my selections are discontinued or delayed?”
- “Do I get a revised construction schedule after design center, before groundbreaking?”
Builder-Specific Approaches
Highland Homes follows a detailed process where they prepare complete blueprints and order all your finishes before starting construction. You’ll have a formal pre-construction meeting with your construction manager after blueprints are complete, walking room by room through electrical, plumbing, and structural details. This front-loaded planning reduces mid-build surprises.
John Houston Homes has their architectural team draft plans first, then sends them to the city for permits (typically 4–6 weeks in Ellis County municipalities). They schedule a pre-construction meeting with both your sales counselor and construction manager before any dirt moves, a double-layer communication system that improves accountability.
Centre Living Homes transitions you into “Stage 1 – Job Start” after this phase, marking the official move from paperwork to construction. Their five-stage process creates clear milestone markers throughout the build.
Graham Hart uses branded touchpoints: “Lock It In” (homesite + plan + contract) followed by “Meet the Builder,” where you review structural options, timelines, and expectations before groundbreaking. This relationship-first approach reduces miscommunication later.
Bloomfield Homes follows the standard pattern: plan + lot + contract → design center → permits—consistent with other large DFW production builders. Their design centers are extensive with dedicated staff to walk you through every selection.
Pro Move: Timeline Protection
Before you sign anything, get the following in writing:
- Estimated construction timeline with specific phase durations
- Builder’s policy on timeline extensions (and whether you get compensation)
- Lock-in timeline for your interest rate if you’re using builder-preferred lending
- Process for communicating delays and timeline adjustments
Reality check: Most North Texas builders are currently running 9-12 months from contract to completion, despite marketing 7-8 months. Budget conservatively. Tell your lease or sale timeline to assume 9+ months. You’ll thank me later.
What This Means for Ellis County Buyers
If you’re building in Waxahachie, Midlothian, Italy or Ennis, understand that permit timelines vary significantly by municipality. Waxahachie’s planning department processes permits faster than Dallas proper, but they’re also seeing volume increases. The South Creek Ranch development is straining regional infrastructure, factor that into your expectations.
Current Ellis County permit timelines:
- Waxahachie: 3-5 weeks average
- Midlothian: 4-6 weeks average
- Red Oak: 3-4 weeks average
- Ennis: 4-5 weeks average
These are averages. Complex plans with structural modifications can potentially double these times.
Stage 2: Permits, Lot Preparation & Job Start
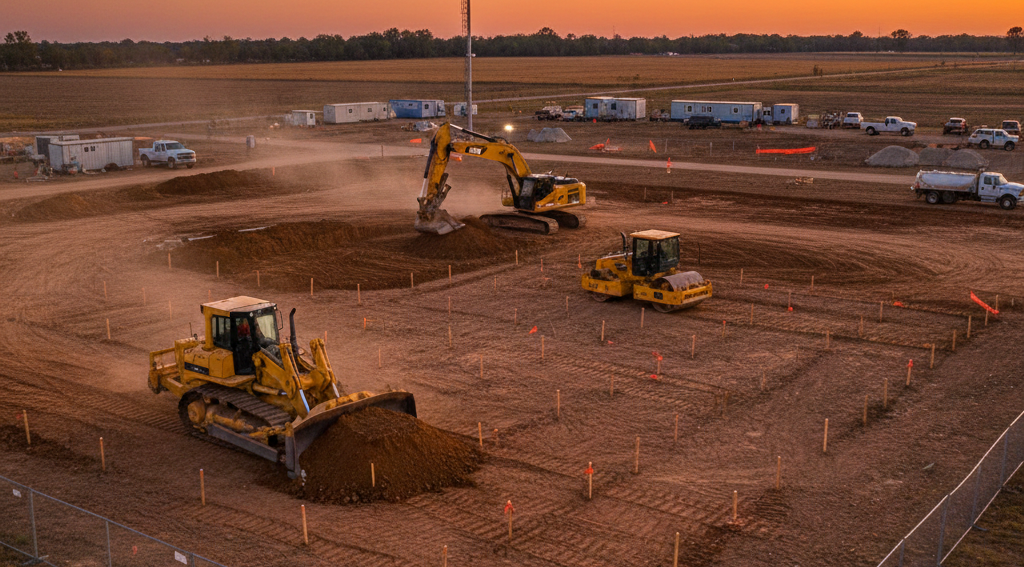
What’s Actually Happening
This is the “hurry up and wait” phase that frustrates buyers. Your contract is signed, your selections are made, and… nothing visible happens for weeks. But behind the scenes, critical work is moving.
Key activities:
- Survey and engineering orders placed
- Utility tap applications submitted (water, sewer, electric, gas)
- Municipal permit applications submitted with full plan sets
- Plan reviews by city/county building departments
- Lot grading and prep once permits are approved
- Pre-construction site inspection to confirm build readiness
The Strategic Reality
Permit delays are the #1 cause of timeline extensions in North Texas right now. Cities are understaffed, plan reviewers are backlogged, and any non-standard feature in your home adds review complexity.
What causes permit delays:
- Structural modifications beyond standard floor plan
- Custom elevation changes
- Non-standard roof lines or architectural features
- Storm water management issues on the specific lot
- Municipal review backlog (uncontrollable)
- Missing or incomplete plan documentation (builder error)
Builder Communication Approaches
Highland Homes conducts “Builder Orientation” once permits are received and the home is ready for foundation. Your Personal Builder introduces themselves, reviews your plan/specs, and explains the construction process before any concrete work begins. This relationship touchpoint sets the tone for the entire build.
John Houston Homes emphasizes their “Lot Inspections & Permits” step, where the lot is physically inspected to confirm construction readiness after your design selections are finalized. Only then do they schedule the actual start date, preventing premature commitments they can’t meet.
Centre Living Homes makes this their official “Stage 1 – Job Start,” the transition from paperwork to physical construction. This milestone marker gives you a clear signal that your build is now active.
Graham Hart moves you from “Meet the Builder” into “Construction Begins,” with a commitment that your Community Sales Manager will communicate at least every two weeks throughout the build. This cadence expectation is unusual, most builders don’t commit to minimum communication frequency.
Pro Move: Permit Tracking
Ask your builder for:
- Copy of submitted permit applications (you should see your selections reflected)
- City permit tracking number so you can monitor status independently
- Estimated permit approval date with explanation of any known delays
- Plan for your notification when permits are issued and construction scheduled
Smart buyers check city permit portals themselves. Most North Texas municipalities have online permit tracking where you can see review status in real-time.
Ellis County Lot Preparation Realities
If you’re building in Ellis County, soil conditions matter. Much of the county sits on expansive clay soils that require post-tension foundations or additional engineering. This isn’t a problem, it’s standard, but it is additional time and cost that should be disclosed upfront.
Questions for your builder:
- “What type of foundation system are you using on my specific lot?”
- “Is any additional soil preparation or compaction required?”
- “Have you built on this street before, and if so, were there any drainage or soil issues?”
The new developments in Ferris are primarily on agricultural land being converted to residential. First-phase lots often reveal unexpected site conditions. If you’re in phase one of any community, add buffer time to your expectations.
Stage 3: Foundation – The Most Critical Week of Your Build
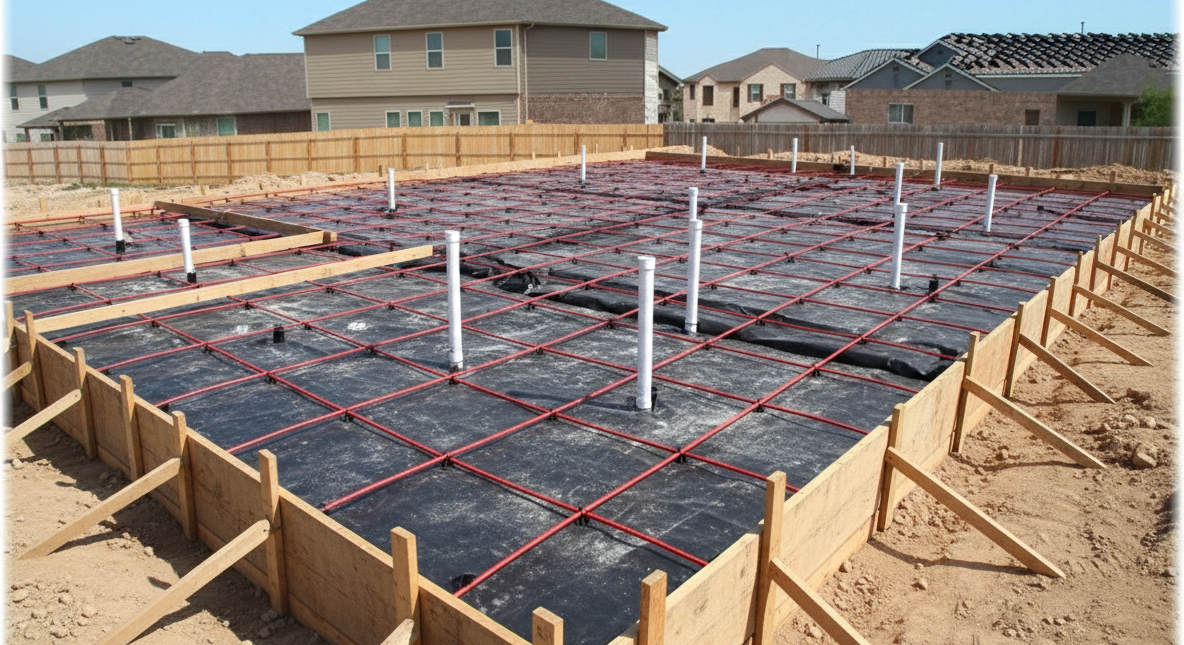
What’s Actually Happening
Foundation week is where most structural problems are either prevented or created. This is concrete, rebar and plumbing, i.e. the permanent bones of your home. Mistakes here are expensive and complex to fix.
Critical activities:
- Foundation forms set to create slab perimeter
- Plumbing rough-in installed (all under-slab drain and supply lines)
- Electrical conduits placed if required
- Rebar or post-tension cables installed per engineering specs
- Pre-pour inspections by city and third-party engineers
- Concrete pour (typically 150-300 cubic yards for an average home)
- Curing period (7-14 days depending on weather)
- Block or brick foundation walls (in some communities)
- Final foundation inspection before framing begins
The Strategic Reality
Foundation issues are the most expensive post-construction repairs, often running $10,000-$50,000+ if major settlement or cracking occurs. Most problems stem from poor site preparation, incorrect plumbing placement, or inadequate engineering for soil conditions.
Red flags during foundation:
- Construction proceeding in heavy rain or saturated conditions
- Forms that look crooked or improperly braced
- Plumbing rough-in that doesn’t match your floor plan
- Missed inspections or inspection failures
- Rushed concrete pour without proper prep time
Builder-Specific Approaches
Highland Homes labels this “Building the Foundation” with detailed attention to homesite preparation, footer/foundation construction, rough plumbing installation, slab pour, and (in some markets) block wall construction. They conduct multiple inspections for both code compliance and internal quality standards.
Centre Living Homes makes foundation completion their “Stage 2 – Foundation Complete.” This milestone triggers progression to the next build phase. It creates accountability and clear communication about where you are in the process.
John Houston Homes and Graham Hart both follow standard foundation sequences without branded phase names, but maintain their communication cadences. John Houston’s FAQ notes that foundation, plumbing, and subsequent stages each have dedicated internal timelines and inspection schedules.
Pro Move: Foundation Documentation
This is your chance to verify everything before it’s covered forever. Request:
- Pre-pour inspection photos showing rebar/cables properly placed
- Plumbing rough-in photos with your floor plan overlay to confirm locations
- Copy of foundation inspection approvals (city and engineer)
- Written confirmation that foundation meets soil report engineering requirements
- Site drainage plan showing how water moves away from your foundation
Critical question: “Can I walk the foundation before the pour?” Most builders will say yes if you ask early. Do it. Bring your floor plan. Verify that plumbing stub-outs match where your bathrooms, kitchen, and utility room will be.
Ellis County Foundation Specifics
The Texas blackland prairie soil in Ellis County is notoriously expansive. Proper foundation design here typically requires:
- Post-tension slab systems (cables tensioned after cure to prevent cracking)
- Engineered fill and compaction under the slab
- Proper site grading to manage water away from the foundation
- Deeper footers in areas with significant clay content
If your builder is using a standard slab-on-grade without post-tension in Ellis County, that’s a red flag. The Foundation Performance Association provides guidelines for expansive soil construction, your builder should be following them.
Waxahachie-specific note: The eastern side of Waxahachie toward Ennis has particularly challenging soils. If your lot is in this area, verify enhanced foundation engineering.
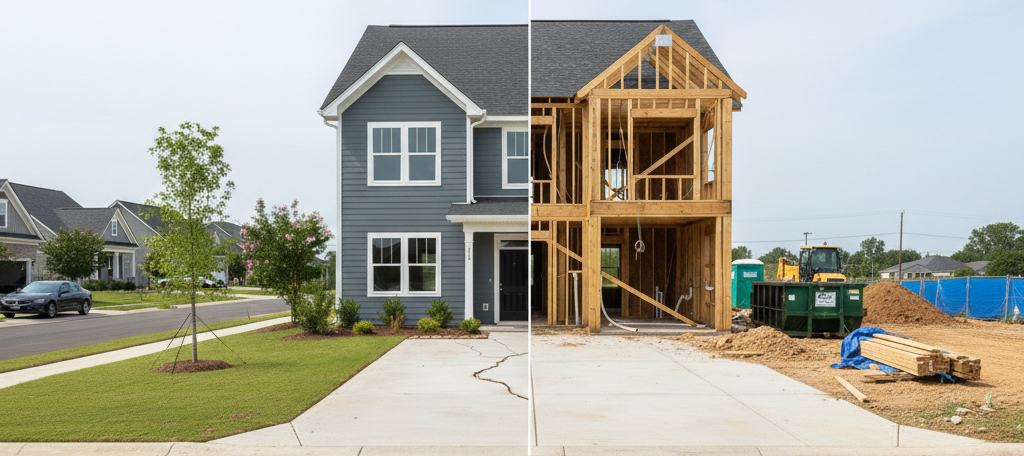
Stage 4: Framing, Rough-Ins & Mechanical Systems
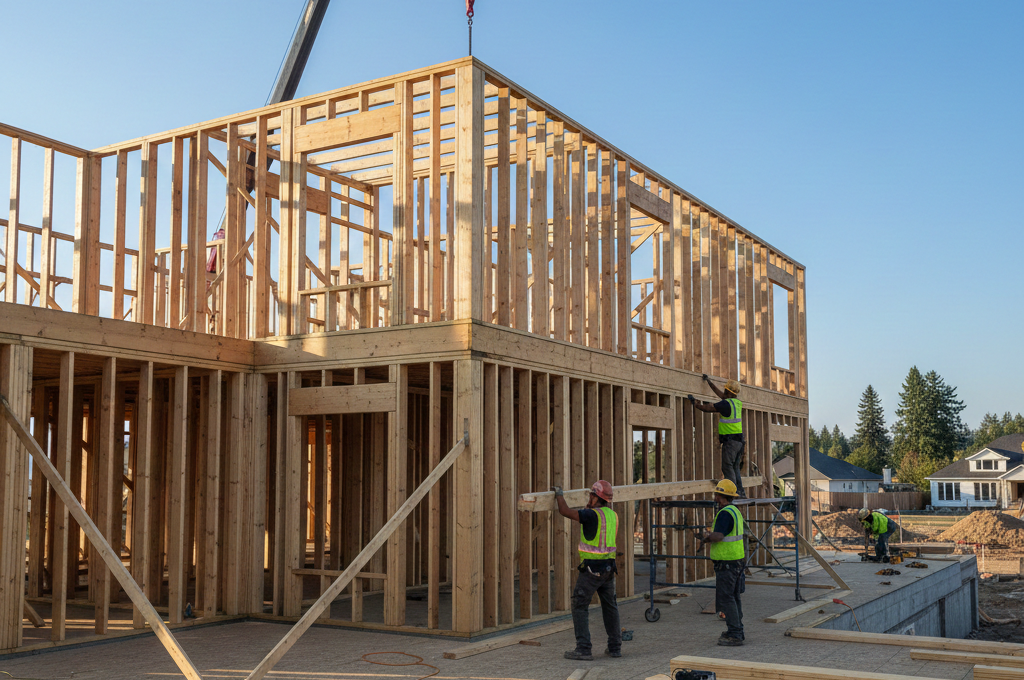
What’s Actually Happening
This is the most visible phase of construction. Your home goes from concrete pad to recognizable structure in a matter of weeks. It’s exciting. It’s also where most specification mismatches are discovered.
Key activities:
- Floor framing (if raised foundation)
- Exterior wall framing with proper corner bracing
- Interior partition walls per floor plan
- Roof structure (trusses or stick-built framing)
- Roof sheathing and felt (weatherproofing)
- Window and exterior door installation
- Electrical rough-in (all wire runs and boxes)
- Plumbing rough-in (supply and drain lines)
- HVAC rough-in (ductwork and equipment placement)
- Low-voltage wiring (cable, phone, security, networking)
- Framing inspections by municipality
- Rough-in inspections for each trade (electrical, plumbing, mechanical)
- Insulation installation after inspections pass
The Strategic Reality
Framing is where your floor plan becomes physical reality. This is also where specification errors become obvious. That outlet you wanted in the pantry? If it’s not on the electrical plan, it won’t be there. The extra recessed light in the primary closet? Same issue.
Common problems discovered at framing:
- Electrical outlets in wrong locations or missing entirely
- Plumbing for future bar sink or utility connections not stubbed
- HVAC registers positioned where furniture will need to go
- Low-voltage not run to locations you expected
- Ceiling fans without proper support blocking
- Windows smaller or different from what you selected
The brutal truth: fixing these issues after drywall is installed is 5-10x more expensive than fixing them now. Which is why the next stage is absolutely critical.
Builder-Specific Approaches
Highland Homes calls this the “Framing Stage”, roof installation, interior wall framing, and “everything inside the walls” (electrical, HVAC, insulation) installed and inspected. Their structured approach includes defined quality checkpoints.
Centre Living Homes splits this into two distinct milestones:
- Stage 3 – Frame Complete (structure is up and closed in)
- Stage 4 – Mechanical Rough-In Complete (electrical, plumbing, HVAC finished and inspected)
This separation creates two communication touchpoints instead of one, improving transparency about progress.
John Houston Homes emphasizes their upcoming “Pre-Drywall Meeting” at the end of this phase, they want you engaged before insulation and drywall cover everything up. This is intentional customer protection.
Graham Hart uses a branded “Frame Walk” at this stage. Before drywall, you’re invited to walk the home with the builder to confirm all electrical and plumbing items are in the correct locations. This formal invitation (rather than assuming you’ll ask) reduces missed issues.
Pro Move: Your Pre-Drywall Walk Strategy
This is the single most important walkthrough of your entire build. Here’s how to maximize it:
Preparation (before the walk):
- Get your electrical plan, plumbing plan, and HVAC layout from your design center package
- Print your floor plan with dimensions and room labels
- Review your design center selections and note every outlet, switch, light fixture, and special feature
- Walk through your current home and note what outlet/switch locations you use most
- Make a list of questions and concerns before you arrive
During the walk:
- Bring a tape measure and your printed floor plan
- Test every light switch by seeing where the wire goes (even though nothing is connected)
- Count outlets in every room against your plan
- Verify HVAC register locations (imagine furniture placement)
- Check plumbing rough-in locations (sink, tub, shower, toilet, etc.)
- Confirm any low-voltage runs (networking, security, speakers)
- Look for proper backing where you’ll mount TVs, heavy mirrors, or grab bars
- Check ceiling heights match what you ordered
- Verify window sizes and placement
- Take extensive photos of everything, these may be your only “inside the walls” documentation
Questions to ask:
- “Can you walk me through the electrical in this room and explain what each box is for?”
- “Where will my HVAC zones be separated?” (if you have multi-zone)
- “Is there blocking in the walls where I’ll want to hang heavy items?”
- “What’s the wire gauge on my electrical service?” (should be 200-amp minimum for modern homes)
- “Can you show me where my water main shut-off will be?”
Critical action: If you find any discrepancies between the physical installation and your design selections, document them immediately with photos and written notes. Email your sales counselor and construction manager that same day with specific requests for corrections. Get written confirmation they’ll be addressed.
Ellis County-Specific Considerations
If you’re building in the Waxahachie, Midlothian, or Red Oak area, pay special attention to:
Electrical service: Many Ellis County communities are still served by overhead power. Verify your electrical service type and capacity. New homes should have 200-amp service minimum, this isn’t universal in older subdivisions doing infill.
HVAC sizing: Texas heat is no joke. Your HVAC system should be sized properly for our climate, not undersized to save builder cost. Ask for the Manual J calculation that determines your tonnage requirements. A 2,000 sq ft home in Texas typically needs 3.5-4 tons of cooling, possibly more with large windows or west-facing exposure.
Internet infrastructure: Many Ellis County neighborhoods still don’t have fiber. Ask about available ISPs and whether structured wiring is included for future upgrades. This matters more every year as work-from-home becomes permanent.
Stage 5: Pre-Drywall Meeting – Your Last Chance to Verify Everything
What’s Actually Happening
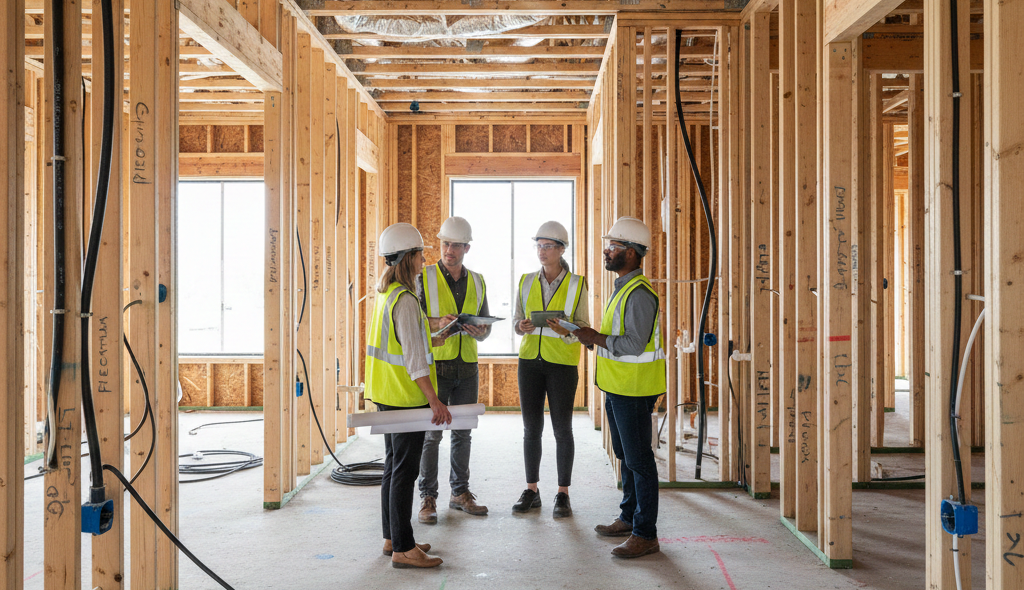
This isn’t a separate construction phase, it’s a critical milestone within the framing/rough-in stage that deserves its own section. This is your last opportunity to see inside your walls before they’re covered forever.
The meeting structure:
- Typically 1-2 hours walking the entire home
- Construction manager or superintendent present
- Sales counselor may attend (varies by builder)
- Electrical, plumbing, and HVAC systems explained
- Your questions answered while systems are visible
- Punch list created for any corrections needed
The Strategic Reality
Builders schedule this meeting because it protects them from post-drywall change requests. But it also protects you, if you speak up now, corrections are simple. After drywall, they’re expensive nightmares.
The National Association of Home Builders reports that pre-drywall meetings catch an average of 3-7 issues per home that would have been costly to fix later. Smart buyers treat this as a quality control audit, not a social visit.
Builder-Specific Approaches
Highland Homes schedules a “Mid-Construction Meeting” before drywall. Your Personal Builder walks you through the home, confirms electrical options and cable/phone pre-wires against your design paperwork, reviews how your selected options are being installed, and explains upcoming stages. This is relationship maintenance and quality control combined.
John Houston Homes calls this a “Pre-Drywall Meeting” and explicitly labels it “critical.” The construction team reviews locations of electrical, plumbing, gas drops, phone/cable, media pre-wire, and framing design. They encourage questions before walls are covered. This isn’t lip service, it’s embedded in their process.
Centre Living Homes aligns this with “Stage 4 – Mechanical Rough-In Complete” moving into “Stage 5 – Drywall Complete.” It’s the practical moment to request a pre-drywall walk with the superintendent. Their five-stage system makes this transition point obvious.
Graham Hart makes this their “Frame Walk” step – a scheduled, optional progress review before drywall to verify all electrical and plumbing are installed where designated. The “optional” framing acknowledges that not all buyers will take advantage, but the invitation is extended to everyone.
Pro Move: What to Bring to Your Pre-Drywall Meeting
Required items:
- Complete design center package with electrical, plumbing, and options lists
- Printed floor plan with room names and dimensions
- Camera or phone for documentation
- Notepad and pen for immediate notes (don’t rely on memory)
- Tape measure for spot-checking dimensions
- Flashlight for looking into walls and dark corners
Recommended items:
- Your real estate agent (if they’re good, they’ll want to be there)
- Copy of your contract with any addendums showing changes
- List of questions prepared in advance
- Your spouse/co-buyer (both decision-makers should attend)
Professional buyer move: Bring your home inspector. Yes, hire them early. A good inspector at pre-drywall will catch issues your untrained eye misses. Budget $200-300 for this, it’s the best insurance you’ll buy. They’ll check:
- Proper wire sizing and connection methods
- Correct plumbing materials and slope
- HVAC ductwork sizing and sealing
- Structural framing compliance
- Moisture barriers and weatherproofing
- Code violations the city inspector might miss
The Questions You Must Ask
Electrical:
- “Can you show me where every switch controls what lighting?”
- “Did we get the upgraded electrical package?” (if you ordered it)
- “Where are my ground fault (GFCI) outlets?” (required in bathrooms, kitchen, garage, exterior)
- “Is there dedicated circuit for my refrigerator and microwave?”
- “Where are my exterior outlets, and are they weatherproof?”
Plumbing:
- “Can you trace the hot and cold lines to each fixture location?”
- “Where will my water heater be?” (verify it matches your plan)
- “Is there a shutoff valve for each bathroom/kitchen?”
- “Did the gas lines get run to all the locations I requested?”
- “Where are my hose bibs (exterior faucets) located?”
HVAC:
- “Can you explain which registers serve which rooms?”
- “Is this system sized appropriately for my square footage?”
- “Where are my return air registers?” (critical for proper system function)
- “Is the ductwork properly sealed?” (gaps waste energy and money)
- “Did you install high-efficiency filters, and where do I change them?”
Structural/Framing:
- “Are there any modifications from the standard floor plan?”
- “Did all my structural options get built?” (media room, extended patio, etc.)
- “Is there proper backing for wall-mounted TVs and heavy fixtures?”
- “Are ceiling heights consistent with what I ordered?”
- “Were any engineering issues discovered that required changes?”
What to Do If You Find Problems
Minor issues (missed outlet, wrong switch location):
- Document with photos immediately
- Add to the builder’s punch list on the spot
- Get verbal commitment it will be corrected
- Follow up via email that same day
- Verify correction before drywall goes up
Major issues (wrong floor plan element, missing structural options):
- Stop the meeting and address immediately
- Demand written explanation of what happened
- Get written plan for correction with timeline
- Involve your sales counselor and builder’s management
- Do NOT allow drywall to proceed until resolved
- Document everything via email
- Consider having your agent or attorney review the situation
Red flag scenarios (call your agent immediately):
- Builder denies you ordered something that’s in your contract
- Construction doesn’t match approved plans
- Builder refuses to make corrections claiming “it’s too late”
- Pressure to approve incomplete work
- Significant structural issues discovered
Ellis County Pre-Drywall Specifics
In Ellis County new construction, pay particular attention to:
Storm shelter/safe room rough-in: If you ordered this, verify it’s framed correctly. Texas Building Code has specific requirements for shelter construction.
Spray foam insulation: Many Ellis County builders now use spray foam in attics and walls. If that’s your spec, it should be installed after rough-in inspections pass but before your pre-drywall walk ideally, or immediately after. Verify coverage and thickness meet specs.
Whole-house fan or attic ventilation: Critical in Texas heat. Confirm your home has either:
- Adequate soffit and ridge venting (passive)
- Powered attic ventilators (active)
- Whole-house fan installation (if ordered)
The North Texas heat will destroy an improperly ventilated attic, leading to $10,000+ in premature roof replacement.
Stage 6: Drywall, Interior Finishes & Exterior Hardscape
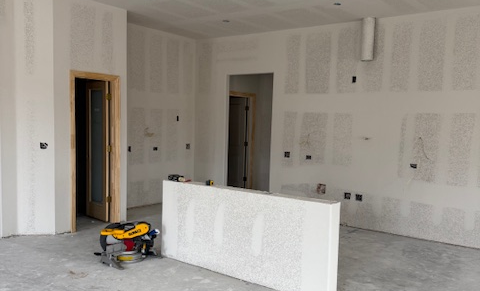
What’s Actually Happening
This is the longest and most complex phase of construction. Your home transforms from exposed framing to finished living spaces. It’s also where the most cosmetic punch list items are generated.
Drywall phase (2-3 weeks):
- Drywall sheets hung on walls and ceilings
- Corner bead and tape applied at seams
- Multiple coats of joint compound (mud)
- Sanding between coats
- Texture application (smooth, knockdown, orange peel, etc.)
- Primer coat applied before paint
Paint phase (1-2 weeks):
- Walls and ceilings painted per your color selections
- Trim primed (if separate color from walls)
- Multiple coats as needed for coverage
- Cut-in at ceilings, corners, and trim areas
- Quality control inspection for coverage and finish
Interior trim phase (1-2 weeks):
- Baseboard installation
- Door casing installation
- Crown molding (if specified)
- Interior doors hung and adjusted
- Window sills and trim
- Closet shelving and accessories
- Stair railings and balusters
- Built-in elements (if any)
Cabinet and countertop phase (1-2 weeks):
- Kitchen cabinet installation and leveling
- Bathroom vanity installation
- Cabinet hardware mounted
- Countertop templating (1-2 weeks before installation)
- Countertop installation (granite, quartz, etc.)
- Sink and faucet rough-in for plumbers
- Built-in appliances rough-in
Tile and hard surface phase (2-3 weeks):
- Shower and tub surrounds tiled
- Backsplash installation
- Accent walls or fireplace surrounds
- Floor tile in bathrooms, laundry, entryway
- Grout and sealing
- Quality inspection and touch-up
Flooring phase (1-2 weeks):
- Hardwood or engineered wood installation (if specified)
- Luxury vinyl plank installation
- Carpet padding and carpet installation
- Transitions between flooring types
- Final protection and cleaning
Exterior hardscape (2-3 weeks, often parallel to interior):
- Driveway concrete poured
- Sidewalks and walkways installed
- Front porch or patio completion
- Drainage swales graded
- Gutters and downspouts installed
- Exterior trim and soffit completion
- Exterior paint touch-up
Landscaping and irrigation (1-2 weeks):
- Sprinkler system installation
- Yard grading and soil prep
- Sod installation (front yard minimum)
- Mulch beds and basic landscaping
- Trees and shrubs (per community standards)
- Final grade inspection
The Strategic Reality
This phase generates 80% of your eventual punch list items. Paint imperfections, drywall flaws, tile lippage, floor gaps, and trim issues are unavoidable in new construction, the question is whether they’re acceptable or must be corrected.
Common finish issues to watch for:
- Drywall: nail pops, visible seams, uneven texture, corner cracks
- Paint: missed spots, thin coverage, wrong colors, overspray
- Trim: gaps at corners, visible nail holes, uneven reveals
- Cabinets: doors misaligned, drawers binding, hardware loose
- Countertops: seams visible, uneven surfaces, chips or cracks
- Tile: lippage (uneven edges), grout inconsistency, cracked tiles
- Flooring: gaps, squeaks, transitions not level, stains or damage
- Exterior: concrete cracking, drainage issues, paint overspray
The tolerance standard: New construction isn’t custom perfection. Industry standards allow minor imperfections within tolerance. But egregious issues, wrong paint colors, cracked tiles, major drywall flaws, must be corrected. Know the difference.
Builder-Specific Approaches
Highland Homes splits this into two phases:
- Drywall Stage: drywall, paint, trim, cabinets, countertops, wall tile, and driveway completion
- Trim Out: final electrical, plumbing, HVAC fixtures, flooring, landscaping and sod, paint touch-ups, finishing touches, quality control checks, and full cleaning
This separation acknowledges that these are distinct skill sets and timelines.
Centre Living Homes makes “Stage 5 – Drywall Complete” their final named milestone. Everything after trim, finishes and landscaping flows internally from this point. Their “service beyond the sale” focus becomes visible here in finish quality attention.
John Houston Homes and Graham Hart both follow the standard progression (drywall → trim → cabinets → hard surfaces → flooring) while maintaining their communication cadences:
- John Houston: sales manager provides weekly updates on what’s happening and what’s coming next
- Graham Hart: Community Sales Manager reaches out every two weeks minimum with progress updates
These check-ins matter more during this phase because timeline estimates get fuzzy. “2 weeks for tile” can become 4 weeks if your installer gets pulled to another project.
Pro Move: Document Everything During This Phase
Weekly photo documentation routine:
- Walk the house every week if possible (coordinate with construction manager)
- Take wide shots of each room showing progression
- Take close-ups of any questionable workmanship
- Photo any damage to installed materials (happens frequently during this busy phase)
- Note what trades are actively working
- Email photos to yourself with date stamps for timeline tracking
Why this matters: If there’s a dispute about when damage occurred or whether an issue existed before closing, your photo timeline is evidence. Builders fix what’s documented as their responsibility. Ambiguous damage becomes “your word against theirs.”
Ellis County Exterior Considerations
Concrete cracking: Texas heat and clay soils guarantee your concrete will crack. The question is whether cracks are:
- Acceptable: hairline surface cracks, control joint cracks (intentional)
- Concerning: cracks wider than 1/4”, cracks that create trip hazards, cracks that indicate foundation movement
Your builder should explain their concrete warranty coverage. Most cover structural issues but not cosmetic cracking. Get this in writing before closing.
Drainage: Ellis County gets intense storms. Your yard grading must move water away from your foundation. At this stage, verify:
- Positive drainage away from the house (minimum 6” drop in first 10 feet)
- Downspouts that direct water away from foundation
- No low spots where water will pool against the house
- Proper drainage swales between lots
Poor drainage is the leading cause of foundation problems in North Texas. This is preventable with proper grading.
Sprinkler system: Most Ellis County builders include front yard irrigation only. If you want full-yard coverage, verify:
- Zone coverage matches your landscaping plans
- Controller is accessible and programmed correctly
- Heads are positioned to avoid overspray on house/driveway
- System connects to separate meter (if available) for lower water rates
The North Central Texas Council of Governments recommends smart irrigation controllers that adjust for weather, ask if your builder offers this upgrade.
Stage 7: Internal Quality Control & Builder Punch List

What’s Actually Happening
This is the phase most buyers don’t realize exists. Before your final walkthrough, the builder conducts their own quality inspection and correction process. This is in their interest, catching and fixing issues before you see them reduces post-closing warranty claims.
Internal QC activities:
- Construction manager final walk identifying deficiencies
- Subcontractor punch list distributed to all trades
- Correction work scheduled with each trade
- Re-inspection after corrections are made
- Deep cleaning of the entire house
- Final trade inspections by municipality
- Certificate of Occupancy obtained from city
- Utilities activated (if not already)
- Final grading and landscaping touch-up
The Strategic Reality
How thorough this internal process is determines your experience at closing and beyond. Good builders catch 80-90% of issues before your final walkthrough. Mediocre builders let you find everything, creating a longer punch list and post-closing hassles.
Signs of thorough internal QC:
- Construction manager walks the house multiple times
- Detailed written punch list shared with trades
- Sufficient time allocated for corrections (not rushed)
- Re-inspection happens before your final walk is scheduled
- House is clean and show-ready when you arrive
Warning signs of rushed QC:
- Your final walk scheduled immediately after “completion”
- House not fully cleaned when you arrive
- Obvious issues that should have been caught internally
- Trades still working when you show up for final walk
- Pressure to close before all punch items are complete
Builder-Specific Approaches
Highland Homes highlights “ongoing quality control checks throughout the building process” to ensure specifications are followed, upgraded options are installed correctly, and overall quality meets Highland’s standards. This isn’t just final walk, it’s continuous throughout construction.
Graham Hart describes this as “Pause For Preparation”, the home goes through final inspections and quality walk-throughs before you’re invited for orientation and closing. This acknowledgment that they need preparation time before your involvement is honest and smart.
John Houston Homes and Centre Living Homes both perform internal QA and required municipal inspections at this stage. John Houston specifically mentions that each stage (foundation, plumbing, framing, HVAC, electrical, etc.) has its own inspection schedule that culminates in the final inspection before closing.
Pro Move: Request the Pre-Final-Walk Timeline
Two weeks before your scheduled final walk, email your construction manager:
**“Can you please provide:
- Your timeline for completing your internal punch list
- When the final city inspections are scheduled
- When the Certificate of Occupancy will be issued
- Confirmation that all corrections will be complete before my final walk”**
This forces transparency about whether things are on track. If they can’t answer these questions two weeks out, your closing timeline is at risk.
What Happens If Your Closing Date Is Approaching
If you’re within 30 days of your scheduled closing and the house isn’t obviously near completion, you need to have a direct conversation:
Questions to ask:
- “Given the current status, what is your realistic completion date?”
- “What specific items remain before final inspections can occur?”
- “If we need to adjust closing, what’s the process and timeline?”
- “Will there be any financial impact to me if closing is delayed?”
- “What’s your plan to communicate timeline updates going forward?”
Your preparation:
- Notify your lender immediately of potential delay (rate lock implications)
- Contact your lease/sale if you have a move-out deadline
- Discuss options with your agent
- Document all builder communications about delays
- Review your contract for delay provisions
Rate lock extensions typically cost 0.125%-0.25% of the loan amount for 15-30 day extensions. If the builder delay costs you this, your contract may require them to cover it, check your addendums.
Ellis County Final Inspection Requirements
Each Ellis County municipality has specific final inspection requirements:
Waxahachie final inspection typically includes:
- Building final (all trades complete)
- Electrical final
- Plumbing final
- Mechanical final
- Gas test and final
- Certificate of Occupancy issued when all pass
Coordination matters: All final inspections must pass before closing. If any fail, corrections must be made and re-inspected. This can add days or weeks to your timeline.
Pro buyer move: Ask your builder for copies of passed inspection reports. These verify code compliance and protect you if issues arise later. Some cities provide online access, check your municipality’s building department portal.
Stage 8: Final Walkthrough, Orientation & “Home School”

What’s Actually Happening
This is your detailed, documented inspection of the completed home before closing. It’s part quality check, part education session, and entirely critical to your post-closing experience.
Typical final walkthrough structure:
- Duration: 2-4 hours for thorough walk
- Attendees: You, construction manager, possibly sales counselor
- Purpose: Verify completion, identify remaining issues, learn your home’s systems
- Outcome: Signed punch list of items requiring correction
What you’re inspecting:
- Completeness: Is everything you ordered installed?
- Functionality: Do all systems, fixtures, and features work?
- Quality: Are finishes within acceptable standards?
- Cleanliness: Is the home clean and ready for occupancy?
- Safety: Are there any hazards or code violations?
The Strategic Reality
This is your last leverage moment. Once you close, you’re relying on warranty service, which is slower and less responsive than pre-closing corrections. Smart buyers are meticulous at final walk, catching every issue while the builder is motivated to get to closing.
The pressure dynamic: Builders want to close on schedule. You might feel rushed or pressured to approve a house with “minor” incomplete items. This is normal. But remember: you don’t have to close on a house that isn’t complete.
Your decision matrix:
- Minor cosmetic issues? Accept with punch list and close
- Missing features or major defects? Delay closing until resolved
- Safety or functionality issues? Do not close until fixed
Builder-Specific Approaches
Highland Homes calls this the “First Walkthrough” of the completed home with your Personal Builder, where any necessary final touches are identified and scheduled. Their relationship model means your builder has been with you throughout, this person knows your home and your expectations.
John Houston Homes schedules a “Pre-Closing Orientation” and final walk. You review the home, note any items needing correction, and sign off just before or on your closing date. Their process assumes closing happens quickly after final walk, so factor this into your inspection thoroughness.
Graham Hart has branded “Home School” which is an in-depth orientation with your Community Building Manager to teach you the ins and outs of your new home and explain their comprehensive warranty program. This education focus reduces post-closing confusion and service calls.
Centre Living Homes follows a similar orientation/walk process at the end of Stage 5 and interior completion. Their “service beyond the sale” philosophy becomes operational here, they’re investing in your long-term satisfaction, which reduces warranty issues.
Pro Move: Your Final Walk Battle Plan
One week before final walk:
- Re-read your contract and design selections so you know exactly what to verify
- Review your pre-drywall photos to refresh your memory about behind-the-walls conditions
- Create a room-by-room checklist of everything to inspect
- Schedule 3-4 hours for the walk (don’t let builder rush you)
- Invite your real estate agent (they should attend and advocate for you)
- Consider bringing your home inspector for $400-800 pre-closing inspection
Items to bring:
- Complete contract and design package with all selections
- Camera or phone for documenting issues
- Notepad and pen for punch list notes
- Flashlight for inspecting dark spaces
- Outlet tester (cheap at hardware store) to verify electrical
- Level to check shelves, counters, floors
- Your pre-drywall photos for reference
- List of questions about systems and warranty
Systematic inspection process:
Exterior (30-45 minutes):
- Walk the perimeter checking foundation, siding, paint, trim
- Verify roof shingles are aligned and complete
- Test all exterior outlets and lights
- Check hose bibs (exterior faucets) for leaks
- Verify garage door operates smoothly and seals properly
- Inspect driveway and walkways for cracks or settling
- Check yard grading and drainage
- Verify exterior paint is complete and clean
- Test sprinkler system (every zone)
Garage and entry (15 minutes):
- Test garage door and safety features
- Verify electrical panel is labeled and accessible
- Check garage electrical outlets and lights
- Inspect garage walls and ceiling finish
- Test entry door lock and operation
- Check entry light fixtures
Kitchen (20-30 minutes):
- Open and close every cabinet door and drawer (is it smooth? aligned?)
- Check cabinet hardware tightness
- Inspect countertops for seams, cracks, chips
- Test sink faucet (hot, cold, spray function)
- Verify garbage disposal works
- Test all appliances if installed (range, dishwasher, microwave, etc.)
- Check under sink for leaks
- Test all electrical outlets
- Verify backsplash is complete and properly grouted
- Check floor for damage or uneven areas
- Test pantry door and shelving
Each bathroom (15-20 minutes each):
- Run water in sink (hot and cold, good pressure?)
- Flush toilet (fills properly? no leaks?)
- Test shower/tub (hot water, pressure, drainage)
- Check shower tile for cracks, grout issues
- Verify exhaust fan works and vents outside
- Open and close vanity drawers and doors
- Check vanity countertop and sink for defects
- Test GFCI outlets (push test button, should trip)
- Check floor for damaged or loose tiles
- Verify mirrors are secure and clean
- Test bathtub for proper slope (should drain completely)
Each bedroom (10-15 minutes each):
- Test all electrical outlets
- Test all light switches and ceiling fans
- Open and close windows (smoothly? seals tight?)
- Check window screens for damage
- Open and close closet doors
- Check closet shelving and rods (secure? level?)
- Inspect walls and ceiling for drywall flaws
- Check paint coverage and quality
- Walk the floor checking for squeaks or damage
- Verify carpet or flooring is clean and undamaged
Living areas, dining, halls (15-20 minutes):
- Same inspection as bedrooms for outlets, switches, windows
- Check fireplace operation if applicable
- Test any built-ins or special features
- Verify paint and finishes throughout
- Walk all flooring checking for issues
Utility room and attic access (10-15 minutes):
- Verify washer/dryer connections (water, drain, electrical/gas)
- Check utility sink if applicable
- Locate and understand water heater (gas or electric? sized properly?)
- Find HVAC air handler and filter location
- Ask to see attic (verify insulation, no damage, proper ventilation)
- Locate and test HVAC system (heat and cool)
Throughout entire house:
- Check every door (opens/closes smoothly? latches properly?)
- Test every light fixture and switch
- Test every outlet (use tester)
- Check all windows (operate smoothly? seals tight? locks work?)
- Inspect trim and baseboard (gaps? nail holes? quality?)
- Check all paint (coverage, color accuracy, touch-ups needed?)
- Walk every square foot of flooring (squeaks, damage, transitions?)
- Check all HVAC vents (properly located? open/close?)
- Look for any cosmetic damage anywhere
- Photograph anything questionable
The Punch List Documentation Process
As you identify issues, document each one:
- Location: “Master bathroom vanity, left drawer”
- Issue: “Drawer binds when opening, doesn’t close smoothly”
- Photo: Take photo of the issue
- Expected resolution: “Adjust drawer slides or replace”
Create your punch list in writing during the walk. Don’t rely on verbal promises. The builder should be taking notes simultaneously. Make sure to verify your lists match before leaving.
Punch list categories:
- Must fix before closing: Missing features, safety issues, major defects, wrong materials/colors
- Fix within 30 days post-closing: Minor cosmetic issues, small touch-ups, adjustments
- Warranty issues: Items that may develop over time or are within normal operating parameters
Critical question before signing punch list:
“What’s your timeline to complete these items, and what’s the process for scheduling and verifying completion?”
Questions to Ask During Orientation
About the home:
- “Where is my main water shut-off, and how do I operate it?”
- “Where is my electrical panel, and can you explain the circuit labels?”
- “How do I reset a tripped breaker or GFCI outlet?”
- “Where are my HVAC filters, what size, and how often should I change them?”
- “How do I operate my thermostat, and what temperatures do you recommend?”
- “Where is my water heater, what type is it, and what maintenance does it need?”
- “How do I operate my sprinkler system controller?”
- “Are there any special care instructions for my flooring or countertops?”
- “What’s the process if I discover an issue after closing?”
- “Can I get copies of all product manuals and warranties?”
About warranty:
- “Can you walk me through my warranty coverage in detail?”
- “What’s covered for how long?” (typical: 1 year workmanship, 2 years systems, 10 years structural)
- “How do I submit a warranty claim?”
- “What’s your typical response time for warranty requests?”
- “Are there any exclusions or limitations I should know about?”
- “What’s considered normal vs. warrantable?” (critical for issues like drywall cracks)
- “Is there a warranty company or is this your own warranty?”
- “What’s the process for disputes about warranty coverage?”
About next steps:
- “When will my punch list items be completed?”
- “Will I need to be present for punch list work?”
- “How will I know when punch list items are done?”
- “When will I receive all product manuals and warranties?”
- “When will I get keys and final closing documents?”
- “Who do I contact after closing for any issues or questions?”
What If You Find Major Issues?
Scenario: Missing or incorrect major items
- Example: Wrong countertop color, missing light fixture, broken appliance
- Action: Do not close until resolved
- Communication: “I appreciate the schedule pressure, but I can’t close on an incomplete home. Let’s get a timeline to resolve these items, then reschedule closing.”
Scenario: Safety or code issues
- Example: GFCI outlets not working, handrail missing, CO detector not installed
- Action: Do not close until fixed and re-inspected
- Communication: “These are safety issues. I need written confirmation from the city that this meets code before I’ll close.”
Scenario: Many minor cosmetic issues
- Example: Paint touch-ups needed, some trim gaps, minor tile grout issues
- Action: Create detailed punch list, acceptable to close if builder commits to timeline
- Communication: “I’m comfortable closing with these items on punch list if I get written commitment to 30-day completion and process to verify.”
Ellis County Closing Specifics
Title company: Most Ellis County builders close at their preferred title company. Common ones include Capital Title, Stewart Title, and local Ellis County title companies. You have the right to request your closing location, but builders often specify in the contract.
Closing timeline: Texas closings typically happen mid-morning (allowing for wire transfers to clear). Plan for 1-2 hours at closing. You’ll sign loan documents, settlement statement, title documents, and builder closing documents.
Items you’ll receive:
- Keys and garage door openers
- Product manuals and warranties
- Warranty coverage documents
- Homeowner association documents (if applicable)
- Utility account setup information
- Loan documents copies
- Survey and plot plan
- Blueprint of your home (request this if not provided)
Final payment: You’ll wire your down payment funds or bring cashier’s check. Verify amount and wiring instructions with your title company directly (phone call, not email ATTENTION: wire fraud is rampant in real estate).
Stage 9: Closing, Move-In & Your First 30 Days

What’s Actually Happening
Closing day is exciting, you’re finally getting keys. But it’s also the beginning of your homeownership journey with this builder, not the end of your relationship.
Closing day activities:
- Sign all loan documents
- Sign title and deed documents
- Sign builder closing documents and warranty acknowledgments
- Receive keys, garage remotes, and any alarm codes
- Receive product manuals and warranty information
- Final settlement statement review (verify all credits and charges)
- Wire or provide down payment funds
- Title and loan officially record
Post-closing immediate tasks:
- Change locks (or verify only you have keys)
- Set up utilities in your name (if not already done)
- Document home condition with photos/video
- Review and file all closing documents
- Notify USPS of address change
- Update address with banks, insurance, subscriptions, etc.
First 30 days:
- Punch list work completion (per your closing agreement)
- Verification walks to confirm punch items are done
- Normal settling observation (minor drywall cracks, etc.)
- System familiarization (HVAC, sprinkler, etc.)
- Warranty claims for any legitimate issues discovered
The Strategic Reality
Your relationship with your builder is now shifted from sales to service. Response times slow down, priorities change, and you’re competing with current sales prospects for attention. This is normal but frustrating.
Common post-closing issues:
- Punch list work takes longer than promised
- New issues discovered during normal use
- Settling causes cracks, gaps, or squeaks
- Landscaping struggles or dies
- Confusion about warranty coverage
- Difficulty getting timely responses
Your protection strategy:
- Document everything: Photo/video your home immediately after closing while it’s in “builder delivery” condition
- Report issues promptly: Don’t wait months to report legitimate concerns
- Use proper channels: Follow builder’s warranty claim process exactly
- Be reasonable: Understand normal vs. defective (hairline drywall cracks are normal, big structural cracks aren’t)
- Maintain records: Keep copies of all warranty claims and responses
- Follow up persistently: Don’t let issues languish unreported or unresolved
Builder-Specific Approaches
John Houston Homes notes that historically, construction averaged about 7 months from signing to completion, with build times influenced by market conditions. They coordinate with their preferred lender so rate locks can be timed as the home nears completion, this matters for your financing.
Graham Hart schedules closing with Capital Title in Colleyville and commits to post-closing follow-up within the first two weeks to ensure your family is settling in and the transition is smooth. This proactive check-in is unusual, most builders go silent after closing.
Highland Homes, Centre Living, and Bloomfield all hand off to their warranty/customer care teams after closing. You’ll receive instructions for submitting warranty requests and an outline of coverage (typically following a 1-2-6 structure: 1 year workmanship, 2 years systems, 6 years structural).
Understanding Your Warranty Coverage
Typical North Texas builder warranty structure:
Year 1 (Full workmanship warranty):
- Everything related to workmanship and materials is covered
- Normal use defects should be repaired at no cost
- Response times vary (emergencies vs. cosmetic issues)
- Some items excluded (landscaping often has shorter coverage)
Year 2 (Systems warranty):
- HVAC, plumbing, electrical systems covered
- Workmanship defects may still be covered by some builders
- Appliances typically covered by manufacturer warranties separately
- Some cosmetic items no longer covered
Years 3-10 (Structural warranty):
- Major structural defects only (foundation failure, roof structural collapse, etc.)
- High bar to prove defect vs. normal settling
- Often backed by third-party insurance
- Requires documentation and proof of builder responsibility
Common warranty exclusions:
- Normal wear and tear
- Damage caused by homeowner
- Natural settling and minor cracking
- Landscaping after initial establishment period
- Exterior caulking and weatherproofing maintenance
- Issues caused by homeowner modifications
- Damage from weather, flooding, or natural disasters
The warranty reality: Builders define “defective” narrowly. A door that sticks in summer humidity? “Normal seasonal adjustment.” A crack in drywall? “Normal settling.” Slow drain? “Homeowner maintenance issue.”
Your approach:
- Report everything legitimately concerning while in warranty
- Document with photos and written description
- Follow builder’s exact submission process
- Be persistent but professional
- Escalate through proper channels if unsatisfied
- Keep copies of everything
- Don’t assume something is “normal” without asking
Ellis County First-Year Specifics
Foundation observation: Your first year in Ellis County will teach you about expansive clay soils and seasonal foundation movement. Some seasonal cracking is normal. Concerning signs:
- Normal: Hairline cracks at drywall seams, minor door adjustments needed seasonally
- Concerning: Cracks wider than 1/4”, doors that won’t close, visible foundation cracks, gaps appearing at baseboards
Water your foundation: Yes, seriously. During hot, dry periods, keeping soil around your foundation consistently moist reduces differential movement. Many North Texas foundation experts recommend soaker hoses around the perimeter during summer.
Sprinkler system adjustment: Your builder installs a basic system. You’ll need to:
- Adjust run times seasonally (more in summer, less in winter)
- Repair broken heads as they’re discovered
- Winterize if we get hard freezes (rare but happens)
- Supplement with hand-watering for new plantings
Landscaping establishment: Front yard sod is typically included, but it’s “establish grade” sod, the cheapest available. Expect to:
- Water heavily for first 30 days (twice daily in summer)
- Fertilize after establishment
- Overseed thin areas in fall
- Understand that full establishment takes 6-12 months
Energy bills: Your first summer and winter will educate you about HVAC sizing and efficiency. North Texas temperature extremes are real. Budget $150-250/month extra for electricity in summer for average-sized homes.
When to Call Your Real Estate Agent
Even post-closing, your agent should be a resource:
Situations to involve your agent:
- Builder not responding to legitimate warranty claims
- Disputes about what’s covered or what’s “normal”
- Pressure to accept solutions you’re not comfortable with
- Need for vendor recommendations (if builder won’t fix)
- Questions about escalation or legal options
Your agent’s reputation with the builder can open doors when you’re hitting walls. A good agent maintains relationships and can often get responses when direct homeowner requests stall.
Current Market Conditions Impact on New Construction Timelines

North Texas Market Reality Check
If you’re starting a new construction contract in Ellis County or greater DFW right now, here’s what you need to know about current conditions affecting timelines:
Interest rate environment: After recent Fed actions, rates have stabilized in the 6-7% range for conventional mortgages. This is affecting:
- Builder incentives: Many builders offering rate buydowns or price reductions to move inventory
- Lock strategies: Some builders offering extended rate locks due to longer build times
- Contract negotiations: More room for negotiation than 2022-2023 peak market
Labor availability: North Texas construction labor is stabilized but not abundant:
- Skilled trades: HVAC, electrical, plumbing remain 2-3 week backlogs
- Finishing trades: Tile, countertop, flooring installers stretched
- Inspection delays: Municipal inspectors overworked in high-growth areas
- Timeline impact: Add 10-15% buffer to builder estimates for labor availability
Material supply: Most critical shortages resolved, but consider:
- Custom materials: Anything special-order still has long lead times
- Premium finishes: High-end tile, countertop materials, fixtures can delay
- Appliances: Some brands still running 6-8 week delivery times
- Timeline impact: Choose in-stock options or add 4-6 weeks for special orders
Ellis County specific considerations:
The South Creek Ranch development: The 5,200-acre project in Ferris is creating:
- Increased pressure on Ellis County permitting and inspections
- Higher demand for concrete and foundation contractors
- Regional trade contractors prioritizing volume builders
- Opportunity for buyers as builders compete for sales
Infrastructure growth: As Ellis County communities expand:
- Utility providers (water, sewer, electric) seeing capacity challenges
- Some subdivisions waiting for utility extensions before starting
- Road construction around new developments causing access delays
- School district impact fees and requirements adding costs
Municipal processing: Ellis County cities processing record permit volumes:
- Waxahachie fastest growing city in Ellis County
- Midlothian seeing sustained development pressure
- Red Oak and Ennis expanding infrastructure to support growth
- Permit timelines extending during peak building seasons (spring/fall)
Builder-Specific Timeline Expectations (Current Market)
Based on recent completion data:
Highland Homes: Currently averaging 8-10 months from contract to completion in Ellis County communities, with custom options potentially adding 30-60 days.
Centre Living Homes: Running 9-11 months average, though their smaller volume sometimes allows faster turnaround on in-stock spec homes.
Bloomfield Homes: Averaging 10-12 months in their North Texas markets, with some timeline variability based on customization level and specific community.
John Houston Homes: Historically 7-8 months, but current reality is 9-10 months as their volume has increased and labor/material lead times have extended.
Graham Hart: Running 8-10 months for typical builds, with their smaller builder size sometimes allowing more flexibility but less volume buying power for materials.
Critical factors affecting your specific timeline:
- Floor plan complexity: Single-story standard plans are the fastest, two-story with customization takes the longest
- Lot-specific requirements: Corner lots, irregular lots, or lots with challenges add time
- Customization level: Every non-standard option potentially adds delays
- Community phase: Early phases of new communities often slower (infrastructure incomplete), middle phases are usually the fastest, late phases slower (builder focus elsewhere)
- Seasonal timing: Contracts signed in November-February often see summer completions (best weather, high trade availability); contracts in spring may face fall/winter weather delays
Protecting Your Timeline in Current Market
Contract strategies:
- Timeline provisions: Some builders offer compensation for delays beyond X days. Negotiate this if possible
- Rate lock coverage: Ensure your lender and builder coordinate on extensions if needed
- Contingency planning: If you’re selling or have a lease ending, build in 60-90 day buffer minimum
- Earnest money protection: Understand what happens if builder causes unreasonable delays
Selection strategies:
- In-stock materials: Choose from builder’s current inventory when possible
- Popular options: Standard upgrades ship faster than rare requests
- Proven combinations: Ask what configurations they’ve built recently without delays
- Appliance brands: Some manufacturers more reliable than others, ask for the builder’s recommendation
Communication strategies:
- Regular check-ins: Request weekly updates during active construction
- Milestone tracking: Use builder’s stage completion notifications to monitor pace
- Early warning: Ask builder to notify you immediately if any delays emerge
- Documentation: Email follow-ups to verbal updates, create a paper trail and document everything
Red Flags and Warning Signs Throughout the Process
When to Be Concerned
Smart buyers stay alert for signs that their build is going off the rails. Here are the warning signs at each stage:
Contract/Pre-Construction Red Flags:
- Builder hesitant to commit to timeline in writing
- Vague answers about their current build times
- Pressure to make quick decisions without research time
- Design center rushing you through selections
- Missing or incomplete contract documentation
- Builder unwilling to show you other recent completions
- No clear point of contact for construction questions
Foundation Stage Red Flags:
- Work starting before permits visibly posted at site
- Foundation forms looking uneven or poorly braced
- Plumbing rough-in clearly not matching your floor plan
- Work proceeding in heavy rain or saturated conditions
- Inspection stickers missing after critical stages
- Builder defensive when you ask to see foundation before pour
- Concrete truck delivering visible excess or shortage of material
Framing/Rough-In Red Flags:
- Framers working without blueprints visible at site
- Obvious differences between framed structure and your floor plan
- Missing windows or windows wrong size
- Electrical/plumbing rough-in looking sparse or incomplete
- No inspection stickers after rough-in work
- Builder resisting your pre-drywall walkthrough request
- Trades working without proper permits or credentials
Finishing Stage Red Flags:
- Quality of workmanship significantly worse than model homes
- Wrong paint colors or materials from your selections
- Damaged materials being installed (cracked tile, dented cabinets)
- No one working on your house for extended periods
- Work appearing rushed with obvious mistakes
- Missing features from your contract
- Builder avoiding your calls or visit requests
Pre-Closing Red Flags:
- Pressure to close before punch list is complete
- Builder claiming “normal” for obvious defects
- Final walkthrough rushed or discouraged
- Missing product manuals or warranties
- Unable to get clear answers about warranty coverage
- Closing date repeatedly rescheduled last-minute
- Pressure to sign documents you don’t understand
When to Escalate Issues
Minor issues: Report to construction manager via email, follow their process, give reasonable time to respond (1-2 weeks for non-urgent items).
Moderate issues: If the construction manager is non-responsive or dismissive, escalate to a sales counselor and copy the construction manager on all communication. Request a timeline for resolution.
Major issues: Missing structural elements, safety concerns, contract violations, or pattern of non-response requires formal escalation:
- Document thoroughly: Photos, dates, prior communications
- Written escalation: Email to sales manager and builder management, document everything
- Involve your agent: Have them reach out to their builder contacts
- State consequences: “If this isn’t resolved by 2026, I’ll need to [delay closing / seek legal review / file complaint]”
- Follow through: If no response, contact builder corporate office
- Last resort: File complaint with Texas Real Estate Commission if licensed agent/broker is at fault, or Texas Department of Licensing and Regulation for builder licensing issues
The Nuclear Options
When everything else fails:
Delay closing: You don’t have to close on an incomplete or defective home. Your earnest money should be protected if the builder is in breach.
Legal review: Construction defect attorneys offer consultations. If you’re seeing major structural or safety issues, get professional assessment before closing.
Public pressure: Builders care about reputation. Professional, factual reviews on Google, Better Business Bureau, and builder review sites get attention.
Walk away: If the builder is clearly unable or unwilling to deliver what was contracted, walking away (with your earnest money) may be the best outcome. Your agent and attorney can advise on contractual grounds.
Critical reality: Most issues don’t require nuclear options. Most builders want to deliver quality and maintain reputation. Persistent, professional communication resolves 90% of problems. But knowing your rights and options prevents being taken advantage of.
Your North Texas New Construction Success Checklist

Before Signing Contract
- [ ] Researched builder’s reputation (online reviews, BBB, recent buyers)
- [ ] Visited other recent completions by this builder
- [ ] Verified builder’s current average build time (not marketing time)
- [ ] Reviewed complete contract with agent and/or attorney
- [ ] Understand all timeline provisions and delay consequences
- [ ] Know exact deposit amount and refund conditions
- [ ] Have pre-approval letter from lender (preferably builder’s preferred lender)
- [ ] Understand total out-of-pocket costs to close
- [ ] Verified lot-specific considerations (drainage, soil, utilities)
- [ ] Asked about similar floor plans recently completed
During Design/Selection
- [ ] Scheduled adequate time at design center (don’t rush)
- [ ] Brought partner/spouse to ensure agreement
- [ ] Photographed or documented all selections
- [ ] Confirmed lead times for any special-order items
- [ ] Understood upgrade costs and payment timing
- [ ] Asked about alternatives if selections are discontinued
- [ ] Verified structural options will be included in plans
- [ ] Got copies of all selection paperwork
- [ ] Confirmed electrical and lighting specifications in writing
During Construction
- [ ] Have construction manager’s direct contact information
- [ ] Scheduled or performed foundation walk before pour
- [ ] Took photos of foundation rough-in before concrete
- [ ] Scheduled pre-drywall walkthrough 2 weeks in advance
- [ ] Brought floor plans and selection sheets to pre-drywall walk
- [ ] Documented any issues found at pre-drywall walk
- [ ] Received written confirmation of correction timeline
- [ ] Verified corrections completed before drywall
- [ ] Performed weekly or bi-weekly drive-bys during finishing
- [ ] Maintained communication log of all interactions
- [ ] Documented any timeline delays or changes
Before Final Walk
- [ ] Scheduled adequate time (3-4 hours minimum)
- [ ] Invited agent to attend final walkthrough
- [ ] Considered hiring inspector for pre-closing inspection
- [ ] Reviewed complete contract and all selections
- [ ] Prepared room-by-room checklist
- [ ] Gathered tools (outlet tester, flashlight, level, camera)
- [ ] Coordinated with lender on closing timeline
- [ ] Confirmed rate lock expiration and extension options
- [ ] Arranged for any time-sensitive moving/lease items
During Final Walk
- [ ] Inspected every room systematically
- [ ] Tested all electrical outlets and switches
- [ ] Ran water in all sinks, showers, tubs
- [ ] Flushed all toilets
- [ ] Tested all appliances
- [ ] Operated all windows and doors
- [ ] Checked all paint for coverage and quality
- [ ] Inspected all flooring for damage or defects
- [ ] Verified all selections were installed correctly
- [ ] Checked exterior (siding, roof, concrete, grading)
- [ ] Tested garage door and safety features
- [ ] Verified sprinkler system operation
- [ ] Created detailed written punch list with photos
- [ ] Got timeline commitment for punch list completion
- [ ] Asked all systems operation questions
- [ ] Received copies of manuals and warranties
At Closing
- [ ] Read all documents before signing
- [ ] Verified all charges match closing disclosure received 3 days prior
- [ ] Confirmed all credits are applied correctly
- [ ] Received all keys, remotes, alarm codes
- [ ] Got copies of all product manuals and warranties
- [ ] Received blueprint or floor plan of your home
- [ ] Confirmed warranty coverage and claims process
- [ ] Got contact information for warranty service
- [ ] Received copies of all signed documents
- [ ] Confirmed punch list completion timeline in writing
First 30 Days
- [ ] Changed locks or verified you have all keys
- [ ] Documented home condition with photos/video
- [ ] Set up all utilities in your name
- [ ] Tested all systems (HVAC, plumbing, electrical)
- [ ] Changed HVAC filters
- [ ] Programmed sprinkler system appropriately
- [ ] Watered foundation during dry periods (because it’s Texas)
- [ ] Reported any new issues discovered during move-in
- [ ] Verified punch list work completed to satisfaction
- [ ] Filed all warranty and product documentation safely
- [ ] Updated address with USPS, banks, insurance, etc.
Final Thoughts: Positioning Yourself to Win

Look, I’ve walked many clients through new construction purchases in Ellis County and greater DFW. The ones who have the best experiences are the ones who approach this as a strategic process, not a passive transaction.
While other buyers are anxious and reactive, smart buyers are five steps ahead. They’re asking better questions, documenting everything, maintaining relationships, and protecting themselves through staying informed.
You don’t win by hoping everything works out. You win through systematic process, consistent follow-through, and refusing to accept less than what you contracted for.
This guide gives you the roadmap. Your job is to use it.
Key principles to remember:
- Builders are optimized for volume, not individual perfection. Your interests and theirs aren’t always aligned, advocate for yourself.
- Documentation is your protection. Photos, emails, written punch lists. If it’s not documented, it didn’t happen.
- Timelines are estimates, not promises. Budget conservatively, plan for delays, protect yourself with contingencies.
- Quality varies by superintendent. Even within the same builder, you might get excellent or mediocre quality, stay engaged to ensure excellence.
- Warranty is your insurance policy. Understand coverage, report issues promptly, follow procedures exactly, be persistent.
- Your agent is your advocate. Use them, they have relationships and knowledge that help you navigate challenges.
- Walking away is always an option. Don’t close on a house that isn’t right. Your earnest money and peace of mind are worth fighting for.
The Ellis County advantage: You’re building in one of the fastest-growing regions in America. The Dallas-Fort Worth metroplex continues adding over 100,000 residents annually, and Ellis County is capturing significant growth as buyers seek affordability without leaving the region.
Your new construction home is part of communities being built for the next generation of North Texans. Done right, it’s going to serve your family well for years.
But only if you approach it strategically.
Use this guide. Ask the tough questions. Document everything. Don’t accept less than you contracted for, and remember: chaos is opportunity, while other buyers are stressed and confused, you’re positioned to win.
Additional Resources
North Texas Market Insider:
- Choosing A North Texas Builder – Explore the different DFW builders and what each of them has to offer
- Choosing A “Custom” Builder – how to select the right custom home builder for you
- How to Build a Barndominium – everything you need to know about choosing land, a builder and financing your next barndominium project.
North Texas Building & Development:
- North Central Texas Council of Governments – Regional planning and development information
- Texas Department of Licensing and Regulation – Builder licensing verification
- National Association of Home Builders – Industry standards and best practices
Ellis County Specific:
- Ellis County Official Site – Permit tracking and records
- Waxahachie Building Department – Inspection schedules and permits
- Midlothian Development Services – Planning and permitting
- Red Oak Building Inspections – Construction oversight
Consumer Protection:
- Texas Real Estate Commission – Agent licensing verification and complaints
- Better Business Bureau – Builder ratings and complaint resolution
- Texas Attorney General Consumer Protection – Legal resources
Home Inspection & Quality:
- Texas Real Estate Inspection Association – Finding qualified inspectors
- Foundation Performance Association – Foundation engineering standards
Financing:
- Consumer Financial Protection Bureau – Mortgage education
- Freddie Mac Mortgage Rates – Current rate tracking
This guide was created by Bobby Franklin, REALTOR® with Legacy Realty Group – Leslie Majors Team, your North Texas market intelligence source. For personalized guidance on your new construction purchase in Ellis County or greater DFW, reach out at 214-228-0003 or visit northtexasmarketinsider.com.
Last updated: January 2026